|
|
 |
Xbox RF (Radio Frequency) Remote Power On/Off Mod |
 |
Xbox RF (Radio Frequency) Remote Power On/Off ModPublished by  roo465 on 2006-02-15 roo465 on 2006-02-15
Category: Miscellaneous | Page Views: 5,508
Tutorial written by: MomDad on #xbins EFNet (http://www.xbins.org)
Overview:
Back again with a new, cheaper and much easier method to go about doing my original mod from several months ago (XBox $10 RF (Radio Frequency) 150' Range Remote Power On/Off Mod (v0.1)).
Shortly after showing my original method, I re-thought the process and components and figured out a much easier way to do it. This new method completely does away with the need for a relay, voltage regulator, optional batteries, etc. as outlined in my previous method, and is now much much simpler to perform.
As with the old method, not only can you use the tiny doorbell chime remote, but you can still also program the RF frequency into most RF learning remotes , to be able to power on and off the system from your main home theatre remote.
*Note: This mod can be used in conjunction with the XIR Mod (IR Power On/Off), with zero conflicts. In fact, in one of my boxes I have both a XIR and my RF mod joined together for enhanced power switching flexibility!
*Note 2: Performing this mod does *not* require you to remove the motherboard of the front panel from the XBox. (just happened that I had my mobo and front panel removed in the pictures while I did this because I was also working on another fancy mod at the same time)
Required Parts List:
- Wireless Doorbell (the type that uses 2 'C' batteries)
- Wire (24awg/28awg works best)
- Solder*
- Heatshrink Tubing or Electrical Tape*
Optional Parts List:
- Small Plastic Project Box (if you wish to place the receiver PCB inside for protection)
Tools:
- Soldering Iron*
- Screwdriver
- Voltmeter (optional, if you want to test the voltages to verify)
* This mod can also be done in a completely solderless manner by splicing in the - speaker lead to wire 1 of the front panel yellow wires
Procedure:
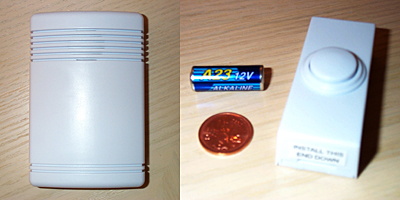
Head on over to your local Home Depot or hardware store and pick yourself up a cheap Wireless Doorbell (~$10). Make sure it's the kind that uses 2 'C' batteries for the receiver (a battery is usually included for the remote transmitter). Note: you don't actually need to buy 2 'C' batteries, since they're not actually used in the mod.

For this mod I used a Zenith SL-6140-A 2-Note Wireless Chime Kit. It has a 100' range (works through walls, people, cats, etc.), 128 selectable frequencies to prevent interference with other RF devices/the PSU, and 3 selectable tunes. With this sucker you can turn on and off your XBox from different rooms if you so desire.
First things first -- set the frequency. The transmitter and receiver both have jumpers for selecting the frequency. I left them at the default setting, but you might have to change these depending on if you get any type of interference from other RF devices nearby, or if you experience any wierdness with the mod not powering off (the XBox PSU/compnents can cause interference). Instructions are included in the package showing how to change the frequency. Just be sure to set both the transmitter and receiver to the same frequency.

Next is the selectable tunes. The unit has 3 different tune settings -- "DING", "DING-DONG", and "Westminster". In this case we want to go with the "DING", as we only require a single voltage pulse to turn on or off the XBox. "DING-DONG" sends 2 pulses and would turn on and off the XBox in one shot, which we wouldn't want. "Westminster", well, don't even try it, unless you want to kill the box :). The jumpers for the ring selection are only in the transmitter unit. For the Zenith model, to get the "DING" tune, you must move one jumper into location 8.
Now it's time to get to work! At this point, just to be sure that the unit was working, I changed the jumpers to the "DING" setting, and popped in 2 'C' batteries, hit the button and sure and sure she DING'd :)
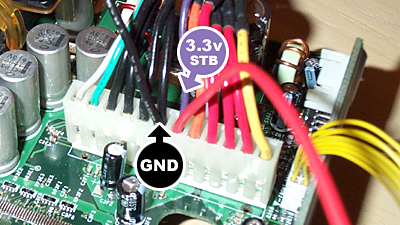
The main reason for using the 2 'C' battery type unit over the 3 'AA' unit in my old method is that it does away with any need for a relay and/or voltage regulator/batteries, since this unit only requires 3v to operate, and we're conveniently provided with 3.3v STB (Standby power when the XBox is turned off) from the XBox Power Supply Unit. Perfect, thanks Bill!

Next you'll want to unscrew and open up the receiver unit. Once open, unscrew the PCB from the shell and snip the + (red) and - (black) leads at the point where they connect to the battery posts. Depending on the spot where you mount the PCB inside your XBox, you may want to extend the length of the + red and - black leads to more easily reach the power supply connector.
If this point, if you have your XBox open and nearby, you can test that it still works by wedging the + and - leads into your XBox PSU (the color of the STB lead may vary depending on your XBox version, but in this case it's the Purple lead, on others it's Brown). Once the leads are wedged in, hit the remote button and you should hear a nice "DING".
center>
Now snip the yellow leads going to the speaker. You can completely snip off the positive + speaker lead right down to the PCB, since we only actually need the negative - speaker lead. On the PCB it's written which speaker lead is +/-. You may also want to extend the length of the - speaker lead to more easily reach the front panel. (in my case, I have it going to a mini molex connector, since I did away with the entire front panel for the showcase system I was working on -- more on that another time :)
Normally, when you press the power button on your XBox, all that is happening is that a signal is being grounded, thereby telling the XBox to turn on or off. So by connecting the - speaker lead to the GND side of the power button, we're essentially giving the XBox an alternate, hands-free GND source.
We're in the home-stretch now!

Now we want to solder that - speaker lead to the bottom pin of the front panel's incoming leads, or the bottom-left pin of the XBox power button microswitch on the backside of the front panel PCB (you don't need to remove the front panel to access that pin, just happened that I had mine out while doing this mod). Also, as mentioned in the beginning, you can opt to do this as a completely solderless mod by simply splicing in the - speaker lead into wire 1 of the front panel yellow wire harness -- splice, twist the wires, stick on some heatshrink or electrical tape and whammo!
Could... it... really... be... THAT simple? Hell yeah! You're done :)
Double-check to make sure your - black lead is wedged into one of the black leads, and the + red lead is wedged into the purple/brown on the XBox PSU connector, and that your - speaker lead is soldered snugly to the front panel.
Now for the moment of truth! Plug in the XBox, pick up the doorbell remote, and give 'er a press -- the XBox will power on! Get to the dashboard, hit the remote button again and the XBox will power off! Don't get too excited and start pressing it on and off too quickly or you'll wreak havoc on the HD just as you would if you powered on and off your computer rapidly. Go to the bathroom or to the kitchen for a snack and give it a press :)
Reassemble the XBox and you're good to go!
Mounting:
In terms of mounting the PCB inside the XBox, you fit it underneath the DVD (can even stick it to the bottom of the DVD with a piece of double-sided tape) I chose to glue on small piece of foam to the bottom of the PCB so as to avoid it shorting out on the motherboard or anything below it. You may also opt to put the receiver PCB in a small plastic project box that you can pick up at most electronic components shops.
Additional Notes:
After having done my original mod, some people have reported that while the XBox always powers on, intermittently it will not power off on the first press of the button. This may be a result of interference from the XBox motherboard/PSU. In this case, try changing the jumper settings (remember you have 128 selectable codes!) to see if that helps. Otherwise, you can extend the length of the antenna on the PCB. Simply solder on a length of wire to the little "leg" shown in the picture below. Then snake the wire around the inside perimeter of your XBox between the plastic shell and the metal shielding.
In Closing:
The little doorbell remote unit works a treat when you're lying in bed or on the couch and don't feel like getting up or walking over to turn on/off the XBox. The remote's PCB is tiny enough that it could even potentially be modded to mount inside one of the regular big XBox controllers with some dremelling of a memcard slot along with a small microswitch a la the other "controller reset switch" mods. And if you happen to have an RF "Learning Remote" for your home theatre, you can program in the frequency and power you XBox and all other components from a single remote.
Enjoy your RF wireless freedom!
Related URL: Discuss in our forums. |
|
|
Browse Tutorials |
|
| |

 | Latest News | |
| Popular Xbox Games | |
 GunGriffon: Allied Strike GunGriffon: Allied Strike
 Page Views: 297,085 Page Views: 297,085
GunGriffon takes place in a hostile futuristic world where there is little hope for survival among the human race. The earth's resources have been exhausted and people are continuously splitting into .. |  | | More Xbox Games |
| |