FenrirOorgata Xbox-HQ Newbie Xbox Version: v1.0 Modded: OpenXenium
Joined: May 06, 2021 Posts: 5
Posted: Thu May 06, 2021 8:42 pm Post subject: [Solved]: v1.0 OpenXenium Frag, Fresh install
Hello, new here. Loved my xbox many years and recently decided to take the plunge into modding it after I recently helped a friend mod a different console.
I desoldered the LPC header holes, tested the device, successful boot.
I soldered on the LPC pin header, tested the device, successful boot.
I soldered d0 from the back of the board, through empty pin 15/16, and up to the OpenXenium chip. Verified continuity between the d0 pad on the modchip and the d0 location on the top of the mobo so I could verify that the two were connected. At this point, with the mod chip disconnected, boots normally.
Plugged the modchip in, frags
tried bridging the recovery pads, still frags
Tried booting with eject, still frags
Double checked that there was no continuity between d0 and any other adjacent pads
Double checked that all adjacent pins on LPC came back negative for continuity.
Still frags.
Unplugged the modchip, leaving d0 connected, boots fine.
Also tried out a different OpenXenium chip. I had misplaced my original, so I ordered a second from a different vendor on ebay, both had good reviews, and both assured me before purchase that they came preloaded with XeniumOS.
Any ideas? I feel like I've tried almost everything to debug this here... Thanks in advance.
Quote:
EDIT: Solved! I counted 3 down for d0 from the wrong direction. Fixed by soldering the correct d0 point
photo_2021-05-06_16-38-14.jpg
Description:
bottom of board, LPC pin header and d0
Filesize:
169.9 KB
Viewed:
729 Time(s)
photo_2021-05-06_16-38-17.jpg
Description:
top of board, LPC pin header and d0 wire
Filesize:
174.25 KB
Viewed:
574 Time(s)
photo_2021-05-06_16-38-21.jpg
Description:
OpenXenium modchip installed with d0 wire
Filesize:
170.64 KB
Viewed:
628 Time(s)
Last edited by FenrirOorgata on Sun Jun 20, 2021 9:42 pm; edited 1 time in total
kaos_engr V.I.P. Lifetime
Joined: Jun 04, 2012 Posts: 194
Posted: Fri May 07, 2021 3:13 am Post subject:
Reflow (reheat) - do not add any more solder - to the LPC debug header connections on the bottom of the motherboard. It looks like the solder has balled up on top of each pin. It has not flowed into the feed-through hole and around the pin to make a good electrical connection.
There also should be no solder on that D0 wire going back across other traces. The solder should only be at the wire connected to the small pad it connects to.
FenrirOorgata Xbox-HQ Newbie Xbox Version: v1.0 Modded: OpenXenium
Joined: May 06, 2021 Posts: 5
Posted: Fri May 07, 2021 3:16 am Post subject:
kaos_engr wrote:
Reflow (reheat) - do not add any more solder - to the LPC debug header connections on the bottom of the motherboard. It looks like the solder has balled up on top of each pin. It has not flowed into the feed-through hole and around the pin to make a good electrical connection.
There also should be no solder on that D0 wire going back across other traces. The solder should only be at the wire connected to the small pad it connects to.
Thanks for the suggestions. I'll give it a try first thing in the morning. Greatly appreciate it.
FenrirOorgata Xbox-HQ Newbie Xbox Version: v1.0 Modded: OpenXenium
Joined: May 06, 2021 Posts: 5
Posted: Fri May 07, 2021 5:24 pm Post subject:
kaos_engr wrote:
Reflow (reheat) - do not add any more solder - to the LPC debug header connections on the bottom of the motherboard. It looks like the solder has balled up on top of each pin. It has not flowed into the feed-through hole and around the pin to make a good electrical connection.
There also should be no solder on that D0 wire going back across other traces. The solder should only be at the wire connected to the small pad it connects to.
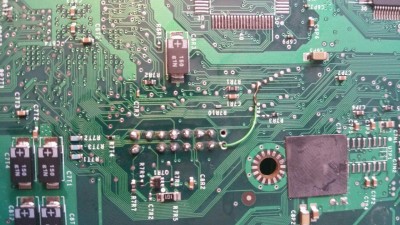
Alright, did my best. Here's an updated picture. Still frags. Trimmed back d0 wire so less exposed, verified d0 connectivity. Reflowed all the LPC header pins with some flux, cleaned it up. Fragged. Then, just as a basic troubleshoot step, I checked voltage between LPC contact points on the modchip while it was powered up, and 2,4,6,9,12 all report back the proper voltages.
Does that look better? Any other ideas?
Thanks again in advance.
photo_2021-05-07_13-20-30.jpg
Description:
Filesize:
283.45 KB
Viewed:
649 Time(s)
kaos_engr V.I.P. Lifetime
Joined: Jun 04, 2012 Posts: 194
Posted: Thu May 13, 2021 4:56 am Post subject:
Hard to tell if the soldering is better, the picture is blurry to me.
> tried bridging the recovery pads, still frags
On an OpenXenium modchip, this may not work. It all depends which XeniumOS binary file is stored on the modchip. The recovery BIOS is missing from most of the XeniumOS files present on the Internet. It was programmed onto original Xenium modchips when produced and not present in any BIOS updates.
FenrirOorgata Xbox-HQ Newbie Xbox Version: v1.0 Modded: OpenXenium
Joined: May 06, 2021 Posts: 5
Posted: Thu Jun 17, 2021 6:38 pm Post subject:
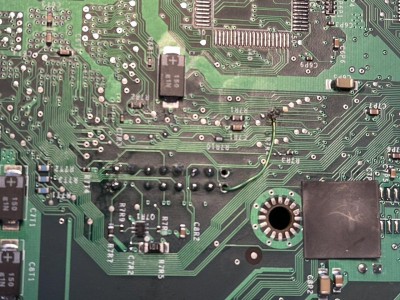
Sorry for the delay. Uploaded a new photo after reflowing the solder several times (both in hopes that a different attempt would work, as well as trying to conform to that guide you sent). I also tried an Aladdin XT-4032 which the seller claimed had EvoX M8plus 16 preflashed.
Still FRAGed. Also tried soldering the d0 to ground, no improvement.
Any other ideas/suggestions?
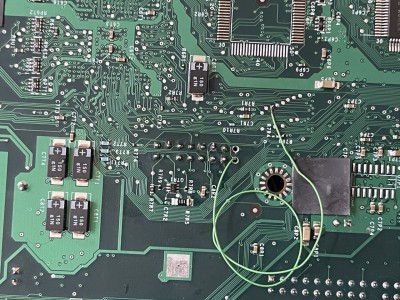
photo_2021-06-17_14-33-48.jpg
Description:
Filesize:
222.79 KB
Viewed:
601 Time(s)
kaos_engr V.I.P. Lifetime
Joined: Jun 04, 2012 Posts: 194
Posted: Sun Jun 20, 2021 3:30 am Post subject:
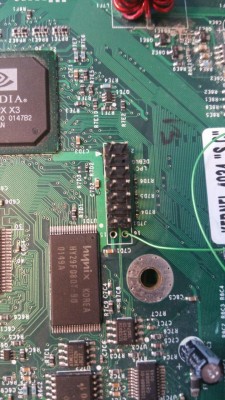
Oh, wait! I should have noticed it in the first set of pictures posted too.
You've soldered to the wrong pad for D0.
Check this image for the location. It's 3rd down from the opposite end of that row of 8 test pads on the bottom of the motherboard.
FenrirOorgata Xbox-HQ Newbie Xbox Version: v1.0 Modded: OpenXenium
Joined: May 06, 2021 Posts: 5
Posted: Sun Jun 20, 2021 9:40 pm Post subject:
kaos_engr wrote:
Oh, wait! I should have noticed it in the first set of pictures posted too.
You've soldered to the wrong pad for D0.
Check this image for the location. It's 3rd down from the opposite end of that row of 8 test pads on the bottom of the motherboard.
Oh man! You are absolutely right. I counted 3 from the wrong direction. Booted up perfectly now! Thank you so much
|
All times are GMT |Page 1 of 1
You cannot post new topics in this forum You cannot reply to topics in this forum You cannot edit your posts in this forum You cannot delete your posts in this forum You cannot vote in polls in this forum You cannot attach files in this forum You can download files in this forum