Joined: Nov 08, 2004 Posts: 571 Location: Georgia, USA
Posted: Thu Dec 09, 2004 6:43 am Post subject: If you messed up your Jewel...
I was thinking about posting this as a reply but thought it would be easier for people that have the same prob to find the solution.
If you are making a jewl clear and have stained it due to scuffs or chemical burns dont worry, the games not over!
Superglue's vapors bond to plastic giving it a white cloudyness (I found that out on the controler mod) and if you dont follow the instructions on how to remove the paint with acrillic (like I didnt) you will get a white discolorment on the surface.
There is a fix, but you need certian materials, ones that cost money.
You need:
Variable speed drimmel
The flexable shaft addon
one of the cotton ended bits
Drimmel polishing compound
Colgate toothpaste
(dosent have to be colgate, cheaper is better, PASTE is the word! Were looking for a thick, slightly gritty texture)
Set up the drimmel to work with the flexable shaft. The reason this is nessessary is when you have the drimmel on the lowest seting its still a little too fast for the job. The shaft adds a little more resistance to the spin, slowing down the bit. Also, the drimmel is more likely to slow down with added pressure when this part is used, in this situation its a good thing. You want the drimmel's body to be sitting at or above the level you will be working at.
This is messy so wear clothes you don't mind red stains on. Get the cotton bit wet and put on the drimel. If your compund is dried up like mine then you want to let some water sit with it so it is like a thick mud.
When putting the compund on the drimmel bit put it at slowest speed possible. Careful, every time you start your drimmel liquid will go everywhere, to keep red lines from appearing on your walls cup your hand over the bit when starting to prevent splatter.
Its important to keep the bit and jewel wet the whole time. I kept a saucer with water by me so I could dip the jewl in there from time ot time. Also, remember sloooooow. If the drimmel goes too fast the cotton bit will burn a dip into the acrilic.
Buff out problem areas. Press gently, but make sure you are making contact. Use a slow circular motion. If you are doing things right where you bufed will be hazy and be the tint of the compound, it will look bad but underneath it looks much beter. Just work over your problem areas for a littlewhile till the problem is gone. You may have to wipe off a section with a paper towel every now and then to see if the job is done. When finished, wipe off the compund with a dry, clean paper towel or t-shirt.
Things should look much better than when you started now. But if you hold it up to light theer is still work to be done. There may be a slight, hardly visible hazyness. If you are an ass like me you want it REALLY clear. Heres where we start fighting cavitys (the small ones the compound made) so whip out the Colgate.
For a cloth I used a linnen. I used to work in a resturant so I had plenty. The material is perfect because its pourus but doesnt obsorb well, so the toothpaste stays in the area Im rubbing without soaking into the material. Im sure a t-shirt will work too. I wouldnt use a terrycloth or towel.
Apply the toothpaste onto the jewel you just buffed, and on the cloth where you will be buffing. Start rubbing. It takes awhile so be patient. Just rub alot. This is the same concept as waxing your car, when you are buffing out the small surface scratches.
Rinse off the toothpaste with hot water when you are done. Its the best way to get that stuff out of the XBOX inscription without removing the silver paint (I kept the silver paint).
Tada! fixed jewl!
This also works if you scratched the jewl or burned a dip into it while trying to polish it (that happened to me when I was learning this process)
Just take some fine grit sandpaper and rub a corner of it in just that spot. at first hard, then gently. Follow up with the polish sesson described above and you will be done in notime (notime=a few hours).
This may be a cumbersome way to fix the problem but most mistakes take time to correct anyway. I did this procedure twice on the same jewel because a friend paid me to mod his Xbox and to me returning a retarded looking jewel wasnt an option to me, cause I put the IMP in pIMP.
So the lesson learned, dont mess up... ever
(yeah right)
PS This method is similar to how people polish off scratches from watchfaces. Apparently some people make hobbies out of this. So if you want to know more about the procedure I just told you then get your Google on. Your bound to stumble across one of thoes sites like I did. _________________ -Scourge "Rx = +/_\"
a.k.a. President Skroob
The electronic ninja.
Xbox v1.6
Xenium Ice XOS v2.3
Xtender: Stock HDD+300G+300G
BIOS: Evox M8_16+
Dash: UX
slick_j_2002 V.I.P. Lifetime Xbox Version: Xbox v1.6 Modded: Xenium Ice
Joined: Oct 29, 2004 Posts: 273
Posted: Thu Dec 09, 2004 2:48 pm Post subject:
Wow, thanks, Scourge. I seriously messed my jewel up not only when I was taking it off )couple deep scratches), but when I was removing the paint (more scratches), and trying to buff them out (dremel burns).
I don't have the flex attachment for the Dremel, but I could pick it up sometime after Christmas. I was planning on just getting a new jewel, and I still may, but this will come in handy when I mod my brother's and friends' boxes in case I screw up their jewels.
Good post!
Scourge Xbox-HQ Freak
Joined: Nov 08, 2004 Posts: 571 Location: Georgia, USA
Posted: Thu Dec 09, 2004 3:34 pm Post subject:
LOL! Of course buying the new medalion is always an option!
I like the Acetate method of removing the paint, but its a love hate relationship. If you use that method BE SURE to keep running water over it.
Ill take a picture of the Jewel I did and post it later. Ill take it with my PDA so it wont be too hot of quality, but if you look carefully you will see a slight bend where I burned it with the drimmel. Its only noticable close up, but after this tech it went ffrom white to clear along with the chemical burns from the acetate.
I suk @ spellin. _________________ -Scourge "Rx = +/_\"
a.k.a. President Skroob
The electronic ninja.
Xbox v1.6
Xenium Ice XOS v2.3
Xtender: Stock HDD+300G+300G
BIOS: Evox M8_16+
Dash: UX
TheModGod Xbox-Hq Legendary Xbox Version: Xbox v1.6 Modded: Xenium Ice
Joined: Apr 18, 2004 Posts: 5303 Location: Greensburg PA
Posted: Fri Dec 10, 2004 4:05 am Post subject:
Once I remove the jewel from the case I drop it in about an inch of gasoline. (regular unleaded for the penny pinchers...lol) I only leave it in there for about ten seconds, when I pull it out the paint peels off just by rubbing it with my finger...works flawlessly and doesn't damage the jewel.
Then I just rinse off with mild soap and water.
TheModGod
-----------------------------
http://www.xbox-hq.com http://www.themodgod.com _________________ Good Deals: Death@Hand, funkydopenloven, StaticMind, Slamscaper, PorscheXboxter
Bad Deals: None Yet
Pending Deals: Vanguard
slick_j_2002 V.I.P. Lifetime Xbox Version: Xbox v1.6 Modded: Xenium Ice
Joined: Oct 29, 2004 Posts: 273
Posted: Fri Dec 10, 2004 5:28 am Post subject:
^^^ If I had known that BEFORE I beat the hell out of mine with Turpentine, sandpaper, toothpaste (gel, damnit, not paste... ), and a freakin' Dremel, I might still have a nice looking jewel.
As it is though, I have a scuffed to hell piece of crap.
Oh well. Guess I can use that method when doing my friends' and brother's boxes.
Scourge Xbox-HQ Freak
Joined: Nov 08, 2004 Posts: 571 Location: Georgia, USA
Posted: Fri Dec 10, 2004 7:04 pm Post subject:
... gasoline?
...sounds dangerous!
Is acrillyc polimer based?
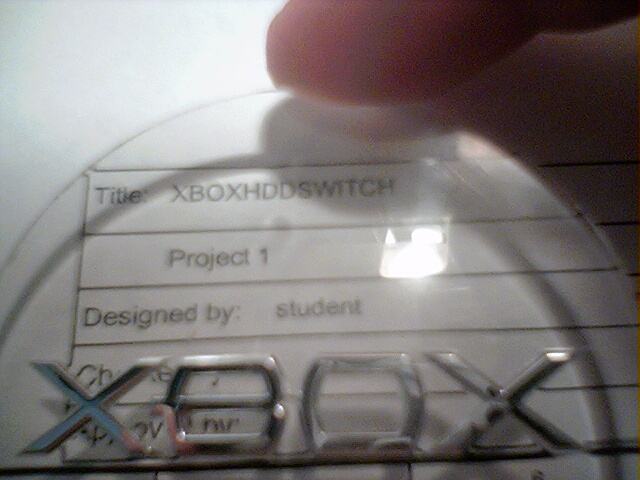
and also you dont want to sand the WHOLE medallion, just the problem areas. Here is the jewel i fixed.
the first picture is the medalion finished. It used to be cloudy white.
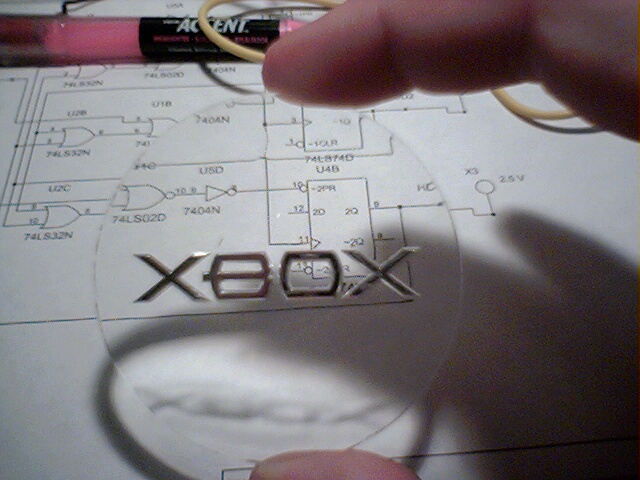
The second is a picture to try to show the place where I had accidentially burned it by the drimmel cotton piece going to fast (I was still learning).
I sanded just that problem part first hard to get off the white crusty plastic, then jently. you dont want to use heavy grit, shingle off your roof tough stuff. I used 150-j emory cloth type sand paper. but higer grit is better, maybe 500 (150-j did fine for me). Then I did the while buffing part.
If it didnt work out for you I can fix it up. If you dont think you can repair it I can give it a try. Just send me like a return shipping label or something so it wont cost me none and I wont mind doing it.
DSC00201.JPG
Description:
The plase where I burned it and fixed is the slight shadow/dip that is above the "1" in "Project 1"
Filesize:
113.42 KB
Viewed:
675 Time(s)
DSC00200.JPG
Description:
This is the general picture.
Filesize:
120.38 KB
Viewed:
681 Time(s)
_________________ -Scourge "Rx = +/_\"
a.k.a. President Skroob
The electronic ninja.
Xbox v1.6
Xenium Ice XOS v2.3
Xtender: Stock HDD+300G+300G
BIOS: Evox M8_16+
Dash: UX
|
All times are GMT |Page 1 of 1
You cannot post new topics in this forum You cannot reply to topics in this forum You cannot edit your posts in this forum You cannot delete your posts in this forum You cannot vote in polls in this forum You cannot attach files in this forum You can download files in this forum