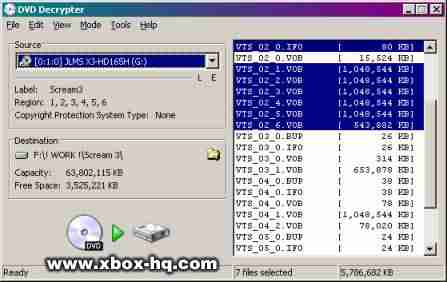
Insert the DVD into your DVD-ROM drive and open DVD Decrypter.
If your screen doesnt look like this, go to Tools and select File. The program will
automatically try and find the movie files on the DVD (usually its the biggest size).
If you are uncertain, rip the whole DVD and check with DVD2AVI. Select the Destination
folder (make sure you have enough free disk space for the amount of KB in the bottom
right-hand corner. When ready press the DVD -> Hard Drive button and the DVD will be
ripped to your hard drive.
STEP 2: Creating the .D2V file and ripping the Audio
Open DVD2AVI, go to File and select Open. Select the first VOB file of the movie
sequence (in this case, VTS_02_1.VOB). DO NOT open any file that says (VTS_0x_0.VOB)
as this can stuff things up. You will get this box after you select the first file, just press OK.
Once the program has loaded the VOB file, press F5 to preview the file. A box will open
on the right-hand side telling you various information, the most important is the Aspect
Ratio and the Frame Rate. Write these down somewhere if you are going to forget them,
as you need to know this when encoding to MPG.
Secondly, demux the audio to see if the AC3 file has a delay, you only have to run
this for a couple of seconds first off to check the AC3 filename. In this demonstration
there isnt a delay, so change this to Decode, and select Dolby Surround Downmix.
Then go back to that menu and turn on the Extract DTS if it's using 3/2 sound.
Go to File and Save Project. This will make a .WAV file and a .d2v file, which you
put into TMPGEnc.
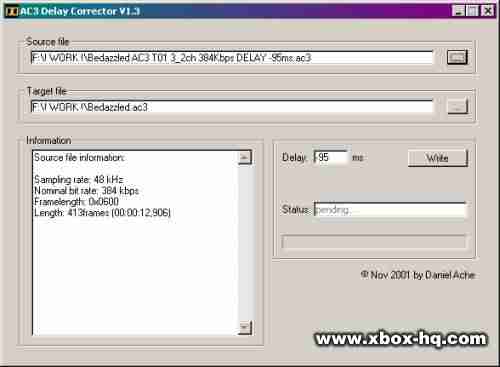
If there is a delay, open AC3 Delay Corrector. Enter the source file, and it will load
into the program and show the delay. Overwrite the -95 with 0 (which means
no delay) and save the AC3 file.
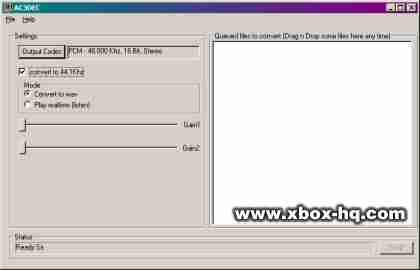
After the AC3 file is saved, open AC3DEC. Change the mode to Convert to WAV
and tick the convert to 44.1Khz box if you wish. Now, select File and Convert.
Enter the name of the AC3 file, and then the program automatically
converts the AC3 to WAV.
STEP 3: Making the MPG File
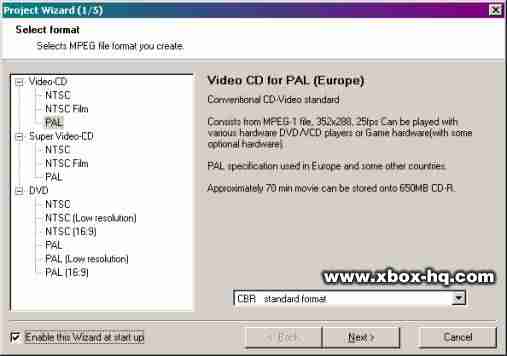
Open TMPGEnc, go to File and select Project Wizard (on default setting this should
automatically appear anyway). Now, this is where the information you got from
DVD2AVI is used:
Firstly you have to select what kind of VCD you want to create, make sure you
select the correct Frame Rate otherwise the movie will stuff up.
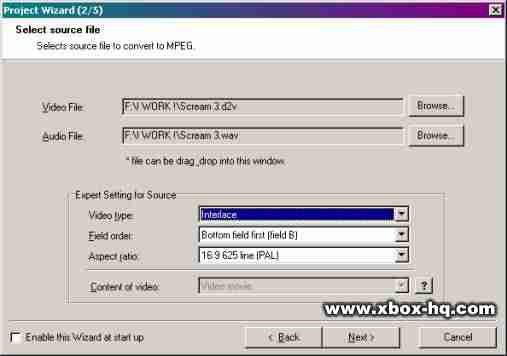
Load in your Video and Audio file, and make sure your Aspect Ratio is set the
same as what you got from DVD2AVI.
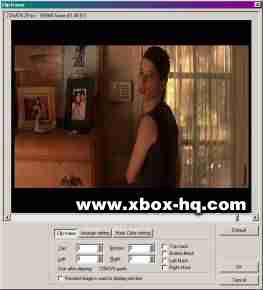
Tick the Clip Frame box.
This is what the original picture looks like. What we have to do now is remove
the black borders from the top, bottom, left, and right. Try and pick a frame
in the movie that has a lot of light so you can cut the borders properly. When
thats done, the screen will look like the screenshot on the right.
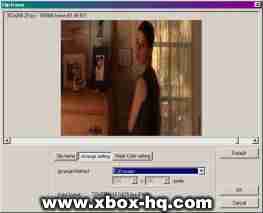
Now we go to the Arrange Setting tab. This is where you insert the border again
(its always wise to clip the movie and add a new border).
Select Full screen (keep aspect ratio) when dealing with Wide screen movies, or
leave it as Full screen if its a Full screen movie.
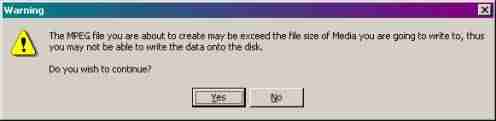
The next page of the wizard shows how big the movie is, this screen isnt really
necessary unless dealing with different Bitrates. You will more than likely get
this warning screen as well, just press Yes to continue.
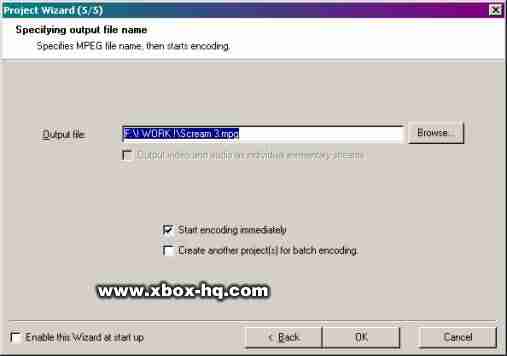
Select your Output file name and location, then select either to encode immediately
or send it to the batch encode list. After a few hours your movie will be encoded
directly from DVD to VCD.
STEP 4: Splitting the .MPG File
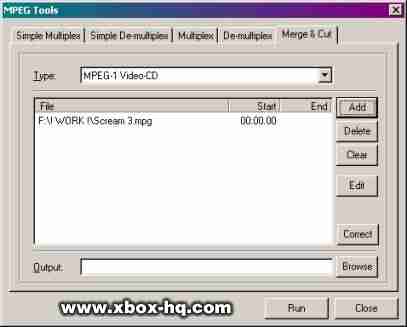
This part is fairly easy, open TMPGEnc, go to File and select MPEG Tools.
You will see a box like this:
Go to the Merge & Cut tab and select MPEG-1 Video-CD as the type. Click the
Add button and load in your .mpg file. When the file has loaded, double-click on the
.mpg file in the box. This next screen will appear.
You are probably asking now where do I split it? Open Chapter X-Tractor and
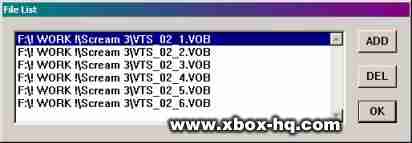
click on Open IFO (This is the index file for a set of VOB files).
Go to the Format tab, and select SVCD as the preset, this will show you the
chapters in hours, minutes, and seconds. The thing is to select the chapter about half-way
through the movie (in this case, chapter 12 which is at 01:05:57:72) NOTE: If the movie
goes over 120 minutes or so, make sure that the spitted section doesnt go over 1:10.00:0
otherwise it wont fit.
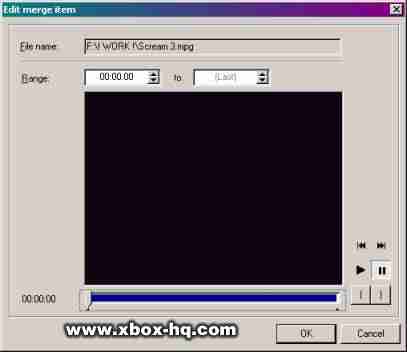
Now, back to TMPGEnc and the Edit merge item screen.
Sorry about the bad screen grab here, it should have an image of the movie in the
black box, but nothing could have been done about it.
Use the scrollbar to go to the time you want to split at (doesnt matter if its a
little bit before it, as you can fix this).
Press the Play button to get a bit closer to the cut, and then pause when its about right.
Now, use the forward/reverse buttons to the point where the last scene finishes before
the cut. Press the button to set the end mark, (of course the button next to it is for the
start mark, but this aint needed for the first part of the movie). Press OK when done.
NOTE: The information you get from Chapter X-Tractor isnt always 100% correct;
it should only be used as a guide to work out roughly where the split needs to be made.
You will be taken back to the first merge & cut screen. Enter the output name
(for example Scream 3 1-2.mpg) and press Run. The program will now split
that portion of the large mpg file.
When its done, double-click on the .mpg filename again. Scroll to where the 2nd part
is going to start the press the button, then go all the way to the end (if its only
got two parts) and press the button. Press OK, get back to the merge & cut screen,
change the filename to f.e. Scream 3 2-2.mpg and press Run.
After a couple of minutes, you will have your 2 files created from the one large MPG file.
It is now safe to delete the huge MPG file, and the folder with the DVD in it.
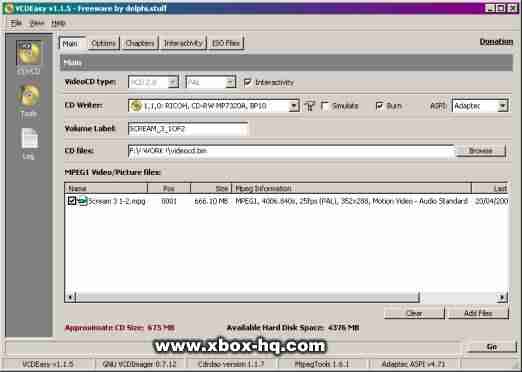
Step 5: Creating the CD Image
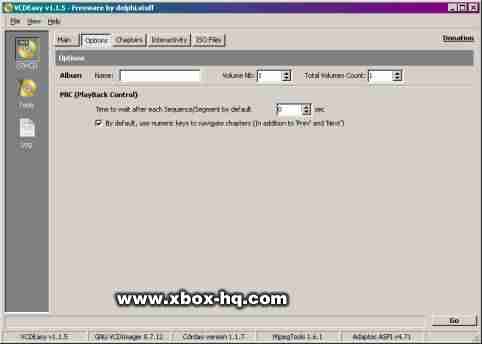
Open VCDEasy and adjust the following settings:
First set the VideoCD Type. If the MPG file was NTSC or NTSCFilm set it to
VCD 1.1 NTSC, otherwise set it to VCD 2.0 PAL. Also make sure the Burn and
Simulate boxes are not ticked, unless you know what you are doing.
When you select VCD 2.0 it gives you the chance to change the options, make
sure you set the time to wait before a new sequence/segment is set to
0 (meaning no wait).
Click Add Files to add your MPG files, select a place to save the CD files,
and press Go.
Now it will create a BIN, CUE, and XML file for the VideoCD. Use CDRWIN to burn the
image to CD (or the burning facility in this program if your burner is supported),
and then delete the BIN, CUE, XML, and MPG files.
Congratulations, youre all done!!
|
All times are GMT |Page 1 of 1
You cannot post new topics in this forum You cannot reply to topics in this forum You cannot edit your posts in this forum You cannot delete your posts in this forum You cannot vote in polls in this forum You cannot attach files in this forum You cannot download files in this forum


 to get a bit closer to the cut, and then pause when its about right.
 to the point where the last scene finishes before
 button to set the end mark, (of course the button next to it is for the
 button, then go all the way to the end (if its only
 button. Press